Guideline for the AS9102 initial sample inspection (EMPB): The demand for high-quality and defect-free "just-in-time" goods is constantly growing, so numerous industries are forced to prove their production capability. To achieve this, companies rely on advanced production machinery from manufacturing companies.
Furthermore, sophisticated testing techniques such as the Initial sample inspection (EMPB) another way to prove the company's products and processes. While first article inspection can be an expensive and labour-intensive process, it is often the only way to successfully complete high-risk projects. This article on AS9102 is a hands-on experience report from one of our InspectionXpert-customers. We look forward to sharing the experience with you.
Check your new component
The first step is rounded off with a well thought-out plan. Familiarise yourself with the drawing, tolerances, specifications and any other information in the title block, as well as any special notes or other instructions found on sheet 1 of your drawing. Many of the new drawings contain critical dimensions (CTQs), which often have very small tolerances and require special inspection techniques and equipment to verify. This information can save tracing later when performing the initial sample inspection and preparing the initial sample inspection report. Drawing notes are usually on the first page of the drawing and often contain relevant information that applies to the entire project, such as test procedures, painting requirements and repetitive information.
A crucial point for a successful initial sample inspection report is the documentation of the entire work process. Manufacturing and inspection activities should be traceable to the customer requirements in the drawing, specifications and purchase order. An example of retrieving all information is the assignment of an internal job number. The recording of customer information and diligence throughout the process is important as these points can affect one's reputation as a manufacturing company.
For example, if the customer sends a new revision to your company and the changes are not properly communicated by your company, you could put the wrong part into the old revision. This, however, would result in a rejected part because it is not possible to transfer the part to the new drawing. This is an important point when creating a first article inspection report: only if all processes are controlled, they are stable.
Video: AS9102 Create test report
The video presentation shows how AS9102 initial sample inspection reports are created automatically with the EMPB software InspectionXpert.
You are currently viewing a placeholder content from Vimeo. To access the actual content, click the button below. Please note that doing so will share data with third-party providers.
More InformationPlanning your AS9102 EMPB
A Test schedule The Inspection and Test Plan (ITP) is an efficient way to get your EMPB planning onto one page. It also gives you an overview of the sequence of all upcoming tasks from the beginning to the end of the project. In addition, an audit schedule can be used to list when the audits will take place, who will perform them, what resources will be used and how often. The following information is included in an audit schedule:
- Drawing number
- Revision
- Order number
- Specification number
- FAI report number (job number)
- Notes on drawing
- Special instructions
- CTQ dimensions.
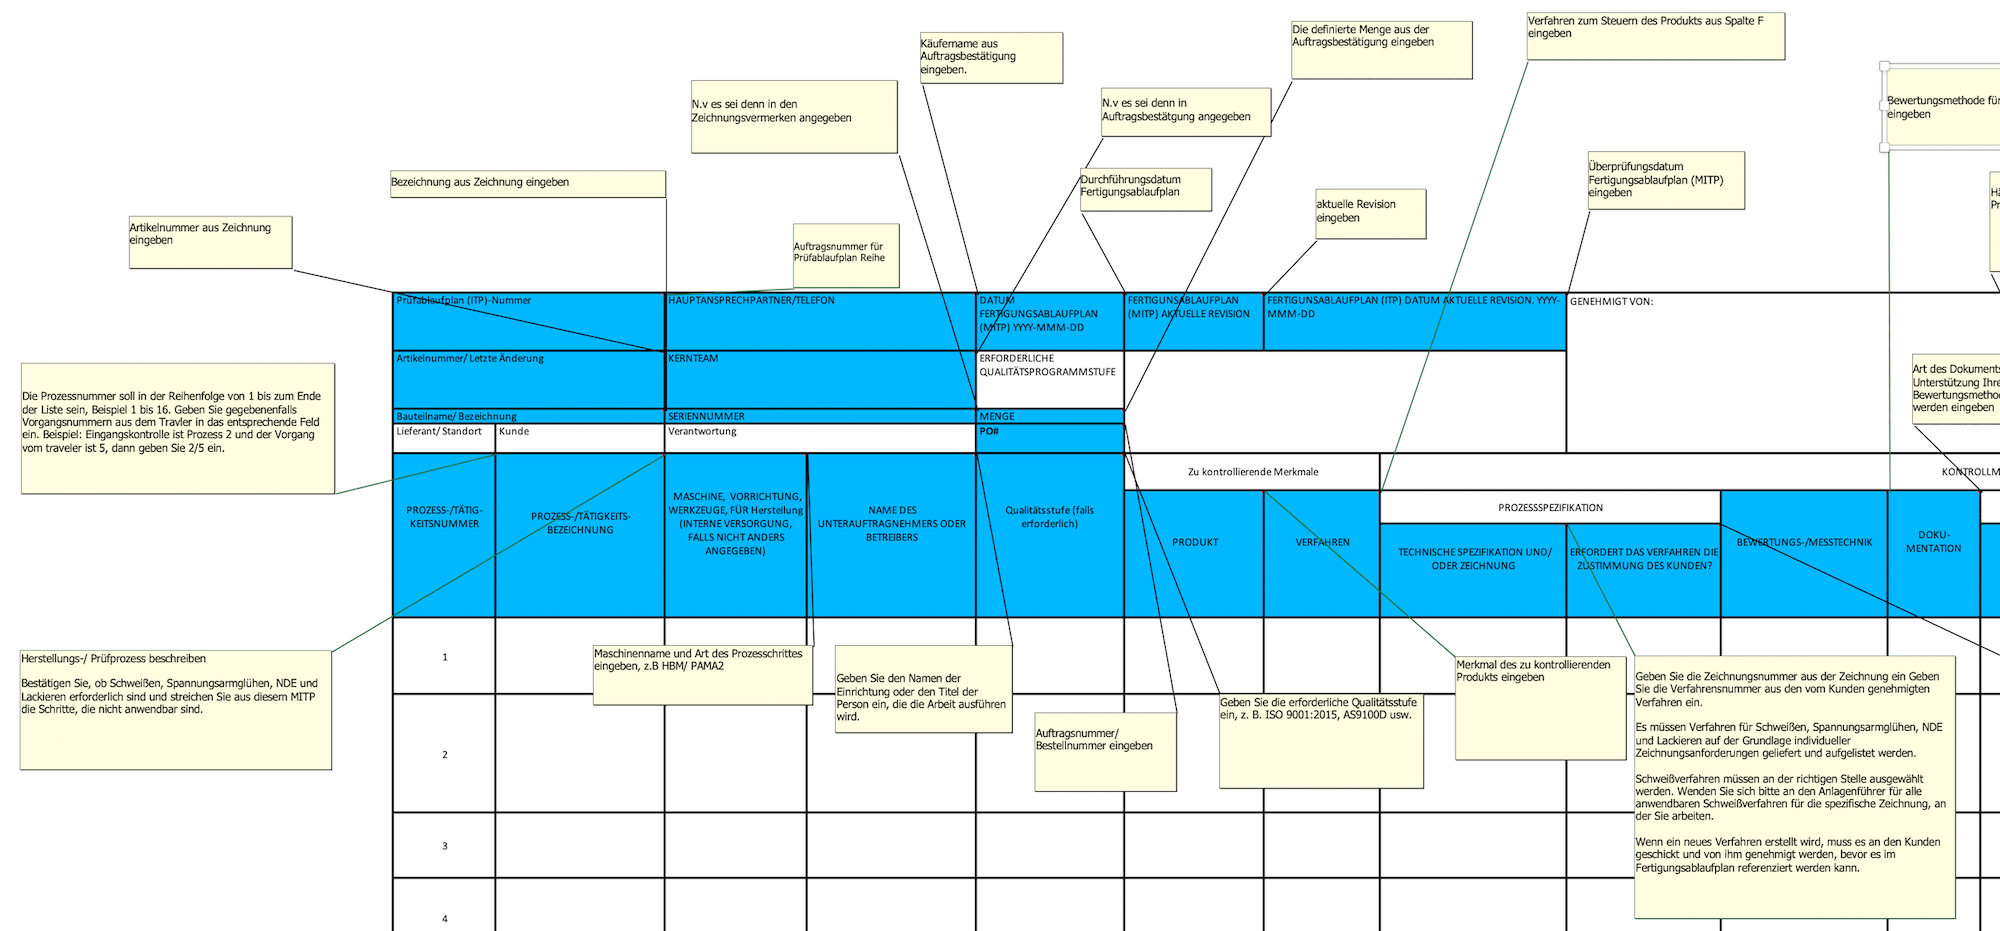
Example of a test sequence plan
You can download the template for an inspection schedule (German and English) in Excel format free of charge:
❯ Download.
Selection of the test tools
Accurate inspection of the part requires precision measuring tools:
- The tools must be calibrated so that the measurement result can be reliably traced back to a known good reference standard
- The type of tool must be listed in your EMPB
- The serial number of the tool must be listed in your report.
To achieve the most accurate measurement possible, the appropriate measuring device must be selected. For round parts, the outside micrometer is the most suitable. Therefore, if the tolerances are small and a vernier caliper is used, it may happen that the vernier caliper indicates the feature outside the tolerance range, although this is not the case. The reason for this is that the caliper is not that accurate. But it can also happen that the outside micrometer has difficulty measuring certain areas or cannot measure them at all. Knowing the measuring equipment and how to use it is an important skill that is learned over time through experience and practice.
Preparing the EMPB
The next step is to prepare the EMPB and perform a 100% dimensional inspection of the part. During this phase, a full test report is prepared that covers all manufactured features (critical and non-critical) and determines whether the product is OK.
We use InspectionXpert to create our initial sample inspection report and enter measurement data for our EMPB. This gives a clear picture of whether the part is OK or whether the manufacturing process needs to be adjusted.
Finally, the comprehensive inspection shows whether the manufacturing processes used to produce the part are stable. This helps to identify and correct any inconsistencies in the manufacturing equipment or processes. It is critical that we capture all dimensions, especially the critical dimensions, and ensure that the correct tolerance is applied. In order for the person responsible for the measurement to recognise which are critical and which are non-critical dimensions, the critical dimensions should have a different stamp style.
Inspect part
Once stamping is complete and all features are set up correctly in the Table Manager, we can start the inspection process by using InspectionXpert's QuickMeasure feature. QuickMeasure is great because it allows you to do all the inspection activities in one place.
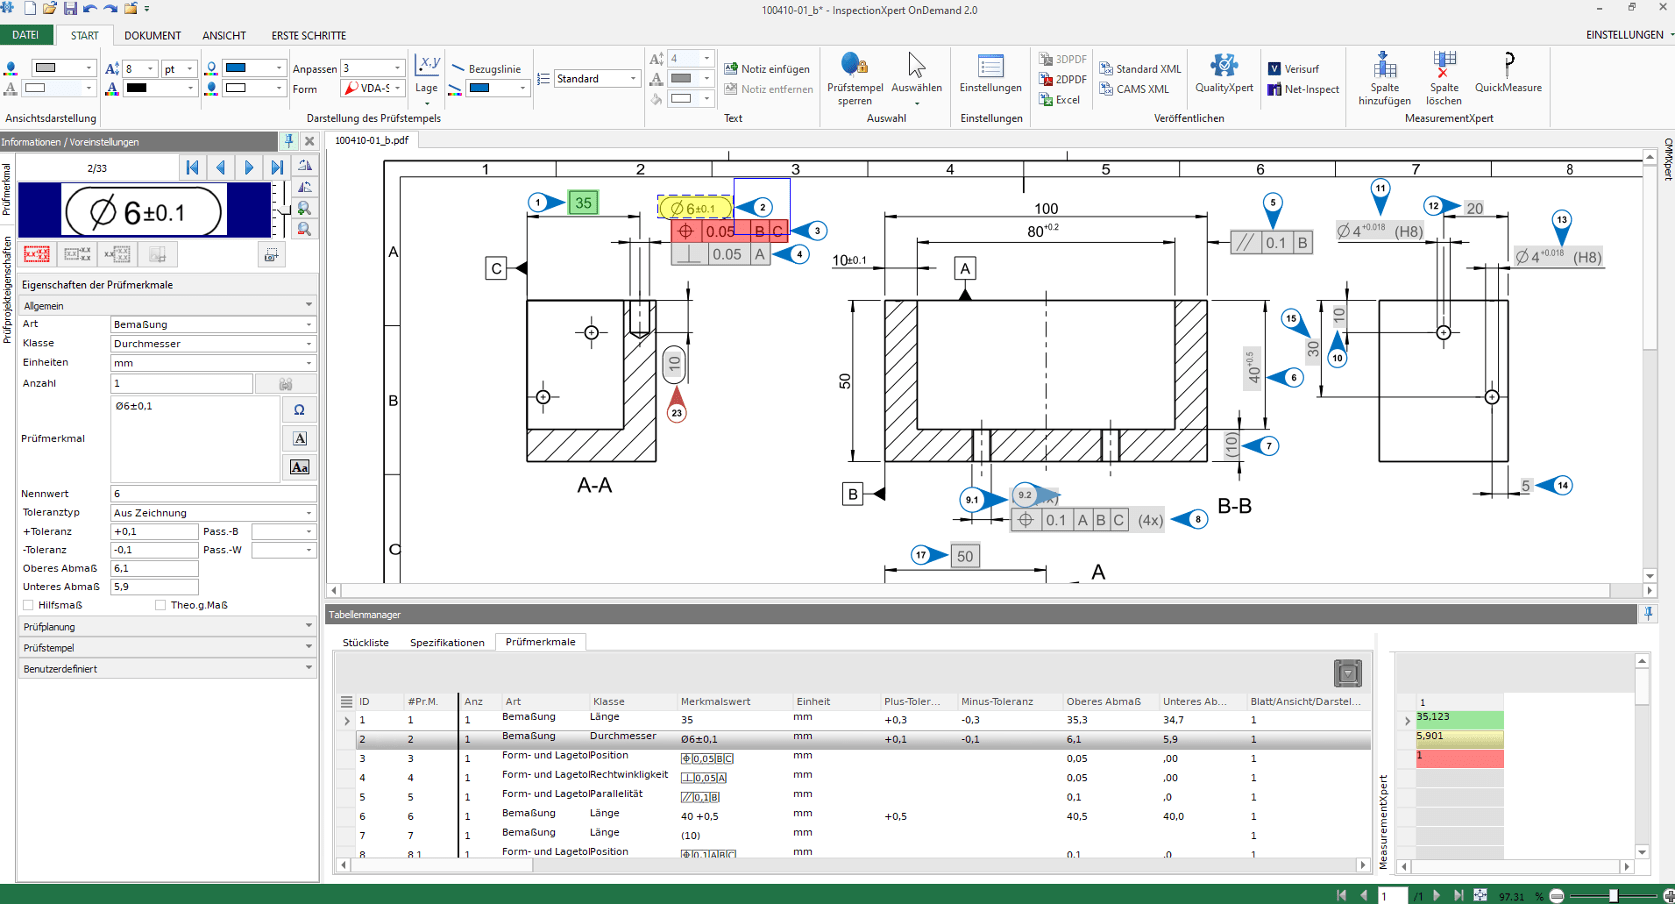
This screenshot of InspectionXpert shows the measurement results using QuickMeasure in the lower right corner (green) and the highlighting on the drawing corresponding to the "passed" or "failed" state (green for "passed" and red for "failed").
On the one hand, this reduces clutter and complexity, and on the other hand, it is faster than exporting the inspection report to Excel and printing out the stamp drawing. With one click on the respective stamp, you can enter your measured values. InspectionXpert applies the standard tolerances you set so that measurements that are within specification are shown in green and measurements that are out of tolerance are shown in red.
This is an invaluable tool when reviewing documents internally or before exporting and shipping to a customer, as colour coding greatly reduces the time and effort required to determine if the part has passed initial sample inspection or if your manufacturing processes need to be adjusted. In the Start tab, you can also export your results to Excel.
Once the verification process is complete, the data must be reviewed and analysed. Any non-conforming dimensions must be reported to manufacturing and corrected. There should also be a discussion about the root causes that led to problems and what the corrective action plan is to prevent these deviations from occurring again in the future.
First article inspection is a highly effective inspection method that can be used in high risk and high cost situations. It becomes more effective the more it is practised. It can also help protect the customer's assets and enhance the reputation of the manufacturing operation. I would strongly recommend trying it out on your next big manufacturing project.
Further information:
